Showing posts with label gelli. Show all posts

Thursday, May 26, 2016

Blog Hop Fathers Day - Paper or Cloth?

Fathers day is rapidly approaching and I have here a little project you can do for  your dear ol dad.

Welcome to our "Just For Him" blog hop with Gel Press™!  Please take time to hop through all the great blogs of our designers for inspiration.  Go back to the Gel Press Blog Hop and leave a comment as to which blog project gave you the most inspiration!  We will draw a random winner from the comments to win a prize from Gel Press™

You will find links to all the projects below

This  also includes a perfect project for kids too. At home or at school.

The point of this post is what you can do with your Gel Press™ Prints.  They are so versatile that they can be used for any project requiring printed papers - or even cloth.

This is the first time that I have used my Gel Press™ plates as a platform for printing fabric, but what a lovely experience it was.

I used the large format Gel Press™ plate 12 x 14 as it suited my needs perfectly and I needed to cover a large area.

I used an old white cotton shirt of mine to test the method.  And was very pleased with the results.


FABRIC BOWTIE with Gel Press™ 

CLICKHERE for both the pattern and how to tie the bow tie - please refer to this for the instructions for cutting out and construction


***TIP*** 
Always be sure to comment, and thank the originator of a project or photo....without these generous people (us included) these projects and tutorials  wouldn't circulate like they now do! 

Materials

12" x 14" Gel Press™ large format plate
Old white cotton shirt
Acrylic Paints
Brayer
Stencils and stamps
Card and Paper stock


With your chosen colours brayer paints evenly and lightly and include stamps or stencils to lay down pattern.  Carefully place your fabric over the plate and smooth firmly but gently making sure you don't disturb the fabric.  Peel off carefully.  Leave to dry!


I ws thrilled with the result and immediately pulled a ghost print above the original, in case I needed it. (Now saved for future use)  I also repeated the process over the rest of the shirt in other colours.  Again, saved for future use. Go to the site and proceed to print out the pattern layout and cut out the pieces.  I deliberately made it half the length for this exercise.  You would need two neck extensions for a "real" neck......


I then pressed each piece and ironed on the interfacing to the relevant sections and sewed together following the instructions.

This can of course be made as a tiable bowtie or a static bow with adjustable straps.  


I am really happy with the results....Now to make it more special!


Take a piece of A4 white card fold in half. Open, cut approx 4 cms down the middle and turn the collar 3/4 way own.  Cut 3cm  towards right from centre and 3cm on the other side, so it looks like photo A.  Turn up corners of first fold.  Draw line down centre from neckline (optional) for shirt opening.  For waistcoat chose complimentary print to bowtie.  Fold to fit front across shoulders and stick down.  Lapels could be cut also.  Trim to fit when dry.  Add 3 buttons to the front and hey presto....you are done!  Fix the Bowtie to the card so that it can be removed easily.


You could of course do the same process for making a standard tie. 

Here I created a very simple card using a Gel Press™ print for an Origami paper tie that I glued to the front of the card.  Simple but effective!  Doing a fabric one would be just as fun!


Here are three more shirts, (short sleeved) made by using the Origami techniques that I found whilst surfing Pinterest (as you do)! Pinterest links to Origami models


Each of these have additional features like the pocket or turned up sleeves.  Use your imagination.  They can be opened to reveal a message or gift, or stuck to a card.  Lets see what you come up with!
  
There are so many wonderful techniques out there but ONLY your printed design makes it unique.

I hope you have enjoyed this feature visiting all the creative design teams items and we look forward to hearing your comments and seeing who will be this months winner!


***BONUS***
Want a bonus chance to win a prize from Gel Press™?  Between now and Father's Day (June 19, 2016) create your own "Just For Him" project and post it on our Facebook page Gel Press Junkies!  Everyone that plays along will be entered in a drawing as well.  Yes, we would love you to use a Gel Press™ in your entry- but you don't have to! Just make a fabulous project featuring Fathers Day and post it!  Maybe you will win a Gel Press™! 
To Qualify for the drawing: 
1) You may enter a maximum of 3 times with individual projects.
2) You must by 18 years old.
3) You must live in the USA.
4) Mentioning other products or other companies in your post disqualifies your project.

See you again next month

Bixxy xx

Please Hop to the next blog hop post via these links....


Back to to Gel Press Blog 

Wednesday, April 20, 2016

World Earth Day with Gel Press

Welcome to the Gel Press Earth Day Blog Hop!

We want to encourage you to reuse and recycle with Gel Press.  Have you thought of making Gel Press Prints on old maps?  What about old Christmas cards or even magazines? 

Hop around and see what our designers have come up with for this hop.  We will be giving away a prize again for the comments on the Gel Press Blog listing what your favorite project was and why. 

Enter by going to all of the blogs listed and linked below.  Leave a comment on the Gel Press Blog telling us your favourite project. 

We will accept comments from April 20th - April 24th.    

The winner will be announced April 25th  on Gel Press Junkies FB page !  Good Luck!


****Please note that the prize is only valid for US residents at this stage***  Sorry!  But this doesn't stop everyone else joining in and commenting


Here is a Step by Step to show what I did to achieve this look and more!

Materials
8 inch Round Gel Press Plate                                                  SLIDESHOW BELOW
Acrylic Paints
Torn Paper
Stencil
Images for decoupage
Assorted pens for embellishing

***Top Tip***  
If you don't know where you are going with a project,  I like to do good quality photocopies of the base print that I like and keep some spares so that I can try different effects on each of them. Its also useful to have so you can create different things for different occasions. Each will still be unique.  This is also useful if something you are trying fails.   You will always have another at hand to do it again.


First select the plate you wish to use


I then printed off a design for under the first layer of paint (have more ready, just in case!!!!!)

I then spread the paint with the brayer making sure that this coat was thin and transparent

Next I lined up my prepared sheet of paper and made my pull. Wipe any areas of paint to expose more of the layer underneath 


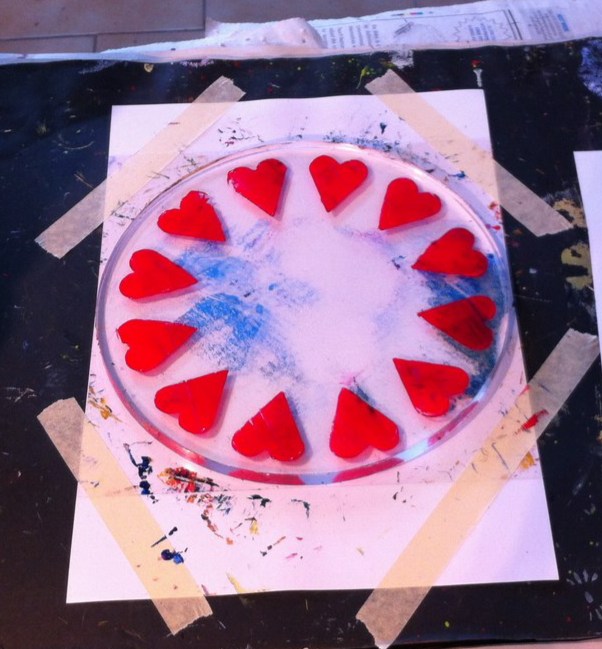
I then add the stencil hearts all around the circle.  I prefer this method on the plate as the pull wont be so dense and it will have more texture to it.


I made my pull!

Tweak any changes you want to make whilst paint is wet maybe to reveal more of the writing beneath

I then added a decoupaged endangered Green Cheek Parrot on tissue and added the lettering via the computer as I was not sure if I want to make this permanent or not.  Remember you are in control!


Here is a slideshow of the others prints created from this session.  Some are finished and some are not and will be saved for a future occasion.  Click on the first image to activate slideshow


Please feel free to leave a comment and ask any questions you may have.
I hope that you enjoyed this blog entry and not its time to visit the others.  Just click on the links below and it should take you to where you need to go.


Till next time

Bixxy x


Gel Press
Kristi,
Teresa,
Keri,
Sandee, 
Cindi,
Cyndi,
Lea, 
Bix, (you are here),
Kathy,
Ann,
Elena


Monday, April 4, 2016

Inspired by Art

Having fun playing with my Gel Press plates again this weekend and have set aside a new blog post step by step for April 20th for World Earth day which will be a blog hop where you can win a Large Format Round plate from Gel Press so keep an eye out for that. 

In preparation for that I was playing around getting ideas for it and the ideas kept flowing. This one is inspired by Monet,

I will post the other ones after embellishment after the Blog Hop;

I have discovered one thing whilst doing all this printing on the Gel Press Plates...I do love it but I love an instant result too.  As I am not a "art journaller per se" (and I do so admire those that are) I cannot see myself cutting out bits n pieces to use in a book or journal.  I paint. I paint pictures mostly in watercolour and therefore I like to produce paintings........so that is what I am going to strive for mostly from this process.

As so many people have requested a video showing how I create my small poppy landscapes I have just finished filming a simple landscape routine which I will be publishing later this week.


In the meantime I have decided I want to run "Inspired by my favourite artist" every month and will deliver the final print on my blog.  I think it is important to study other artists famous or not as it expands our knowledge of techniques, mediums and colours too.  Also the way that those worked before us set certain styles in motion which became the fabric of all the art movements.

So this month I am working on a huge favourite of mine and may do more of his....that was a big hint!!!!

Can you see who the artist is yet????  

More to come soon

Bx

Thursday, March 17, 2016

Birds Nest for Easter Step by Step

"If we always do what we always did we always get what we always had!"


Perfect quote sent to me the other day by my lovely friend and fellow artist Joanne Boone Thomas

What a great saying! And its so true.  I am very much climbing out of my comfort zone and having such fun experimenting with new printing techniques.

I can't believe it was only last week that I received my delivery of all my new Gel Press plates and this is the first time or using a round one. 


So much has happened since then and all of it doing printing! Oh and planning, dreaming, sketching out ideas..............

Gel Press junky is now an understatement.  So whilst the paint is still wet I will fill you in with what I have done.

Here is a short step-by-step on how I achieved my nests of eggs.  A favourite subject at this time of year in all mediums and printing by no means gets left behind!
                                                                 SLIDESHOW BELOW

Materials
  • 8" Round Gel Press Plate
  • Acrylic paints
  • Brayer
  • Copy Paper
  • Bunch of grasses
  • Scrap Paper 
  • Egg cutouts (masks)
  • Embellishing materials and spare prints

 First I dabbed on nest colours of yellow ochre and burnt sienna
 I brayered this over the plate till the colours blended but in a patchy way
I then took my bunch of reed grass and moving around the plate pushed it into the paint thus picking up the paint on the way and leaving an impression
I then used the brayer to roll black paint on the grass
 and then pressed this onto the painted plate to leave black grass impressions
At this point I took a print with the centre a solid colour as one option
I then added three egg cutouts (masks) and pulled another print
I added cream and pink paint and rolled it out over the Gel Press plate
And got this, which I love!  Can you see the childs face in there?  Something to work on later.


Here is a short slideshow showing how some of them ended up.  A couple I would call finished and the others ....well i'll just have to play with those.

Click HERE view slideshow


Happy Easter and see you next time!

Bix x


Sunday, March 13, 2016

Fresh Air?

Spent nearly the whole of last week pretty much locked  in my very "underused in the winter" Studio as I took delivery of 14 different sized Gel Press Plates from Gel Press in the US on Tuesday. So not alot of fresh was had!!! A shock as I only had to wait 3 days and was thrilled when the box arrived jammed packed with goodies.

As part of my  role as a Creative Designer for the Team I need to play with each Gel Press Plate and see what I can come up with and my head is swimming with ideas.

So Tuesday was spent prepping the area in the Studio for my marathon session including lighting the stove on Wednesday and Thursday as it was pretty cold out there and the room takes a good while to warm up.

Somebody else wanted to join me in the warm studio, but at this point, covered in cobwebs, didnt gain entry. But managed to later and left a paw print or two.

I decided that I wanted to work on the 10x8 Gel Press plate as that was a bit larger than what I am used to.  Effectively it is just a wee bit smaller than an A4 sheet of paper as you can see from the image below.

For warming up I just added a few blobs of acrylic paint on the plate and smoothed them out with the brayer and textured the surface with some home made stamps and bubble wrap took a first pull and then added the dragonfly masks and some blue green paint rollered over the top
 
I next planned some landscapes that I had been storing in my "to do" file. And these were the outcome after embellishment

I like instant results so this method suits me well.  One of my favourites is below!


***TOPTIP***
My advice is go for a subject that you love...if you try to create something you do not like it will show in the finished work.

My Bonnie lies over the ocean
I shall be doing a landscape video very soon, so follow me here on this blog and on Gel Press Junkies for the latest updates from me and my Gel Press Creative Team mates..

I hope to launch my website this week so that you can see some Gel Press prints that were created in this session under Recent Work and my other work.


Please feel free to ask questions and leave a comment

Thats it for now

Bix x


Monday, March 7, 2016

First Gel Press Post


Hi everyone,

just announcing first post on the Gel Press Blog showing some of my sketches done on Gel Press prints via a short video I did on Youtube

Hope you enjoy what you see.

Please feel free to leave me a comment below.

Bx

Monday, February 1, 2016

Our 2016 Season - Come join us  


Brochure


If you would like to find out more about us either click on the online Brochure on the right or visit us on our website. 

These will be our tutors this year and we also run our standard art holidays.  This leaves you free to paint when and what you want with the added bonuses of being taken out locally to visit our lovely towns and villages. Any queries can be covered by me if you need some one to one tutoring.  All this and the benefits of ensuite accommodation and full board.  

If you are a tutor and would like to bring your own group, please call and we can discuss the details.  Discounts will be available to 5+ people

Open access to the studio and materials also available

In addition to the above I will also be holding a Craft week to incorporate making unusual christmas decorations and other gifts and a Printing week, to include Gel Prints, watercolour batik, collagraph, decoupage and monoprinting.  Please email me at info@francepaintingholiday if you are interested.

Examples of my work are below: 


Two of these designs have been chosen to be used on fabric for clothes designs.  Take a look here

Thats it for today....two days in a row!!!!  Lets see when I next post.  

Bx