Showing posts with label round. Show all posts

Wednesday, April 20, 2016

World Earth Day with Gel Press

Welcome to the Gel Press Earth Day Blog Hop!

We want to encourage you to reuse and recycle with Gel Press.  Have you thought of making Gel Press Prints on old maps?  What about old Christmas cards or even magazines? 

Hop around and see what our designers have come up with for this hop.  We will be giving away a prize again for the comments on the Gel Press Blog listing what your favorite project was and why. 

Enter by going to all of the blogs listed and linked below.  Leave a comment on the Gel Press Blog telling us your favourite project. 

We will accept comments from April 20th - April 24th.    

The winner will be announced April 25th  on Gel Press Junkies FB page !  Good Luck!


****Please note that the prize is only valid for US residents at this stage***  Sorry!  But this doesn't stop everyone else joining in and commenting


Here is a Step by Step to show what I did to achieve this look and more!

Materials
8 inch Round Gel Press Plate                                                  SLIDESHOW BELOW
Acrylic Paints
Torn Paper
Stencil
Images for decoupage
Assorted pens for embellishing

***Top Tip***  
If you don't know where you are going with a project,  I like to do good quality photocopies of the base print that I like and keep some spares so that I can try different effects on each of them. Its also useful to have so you can create different things for different occasions. Each will still be unique.  This is also useful if something you are trying fails.   You will always have another at hand to do it again.


First select the plate you wish to use


I then printed off a design for under the first layer of paint (have more ready, just in case!!!!!)

I then spread the paint with the brayer making sure that this coat was thin and transparent

Next I lined up my prepared sheet of paper and made my pull. Wipe any areas of paint to expose more of the layer underneath 


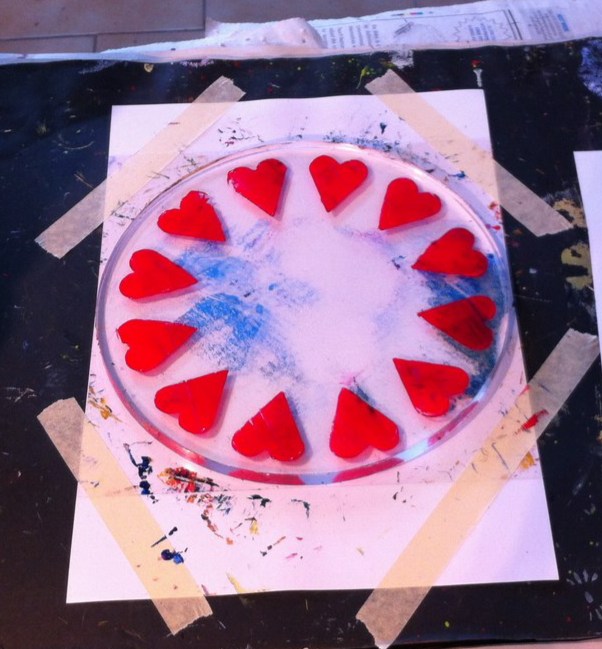
I then add the stencil hearts all around the circle.  I prefer this method on the plate as the pull wont be so dense and it will have more texture to it.


I made my pull!

Tweak any changes you want to make whilst paint is wet maybe to reveal more of the writing beneath

I then added a decoupaged endangered Green Cheek Parrot on tissue and added the lettering via the computer as I was not sure if I want to make this permanent or not.  Remember you are in control!


Here is a slideshow of the others prints created from this session.  Some are finished and some are not and will be saved for a future occasion.  Click on the first image to activate slideshow


Please feel free to leave a comment and ask any questions you may have.
I hope that you enjoyed this blog entry and not its time to visit the others.  Just click on the links below and it should take you to where you need to go.


Till next time

Bixxy x


Gel Press
Kristi,
Teresa,
Keri,
Sandee, 
Cindi,
Cyndi,
Lea, 
Bix, (you are here),
Kathy,
Ann,
Elena


Thursday, March 17, 2016

Birds Nest for Easter Step by Step

"If we always do what we always did we always get what we always had!"


Perfect quote sent to me the other day by my lovely friend and fellow artist Joanne Boone Thomas

What a great saying! And its so true.  I am very much climbing out of my comfort zone and having such fun experimenting with new printing techniques.

I can't believe it was only last week that I received my delivery of all my new Gel Press plates and this is the first time or using a round one. 


So much has happened since then and all of it doing printing! Oh and planning, dreaming, sketching out ideas..............

Gel Press junky is now an understatement.  So whilst the paint is still wet I will fill you in with what I have done.

Here is a short step-by-step on how I achieved my nests of eggs.  A favourite subject at this time of year in all mediums and printing by no means gets left behind!
                                                                 SLIDESHOW BELOW

Materials
  • 8" Round Gel Press Plate
  • Acrylic paints
  • Brayer
  • Copy Paper
  • Bunch of grasses
  • Scrap Paper 
  • Egg cutouts (masks)
  • Embellishing materials and spare prints

 First I dabbed on nest colours of yellow ochre and burnt sienna
 I brayered this over the plate till the colours blended but in a patchy way
I then took my bunch of reed grass and moving around the plate pushed it into the paint thus picking up the paint on the way and leaving an impression
I then used the brayer to roll black paint on the grass
 and then pressed this onto the painted plate to leave black grass impressions
At this point I took a print with the centre a solid colour as one option
I then added three egg cutouts (masks) and pulled another print
I added cream and pink paint and rolled it out over the Gel Press plate
And got this, which I love!  Can you see the childs face in there?  Something to work on later.


Here is a short slideshow showing how some of them ended up.  A couple I would call finished and the others ....well i'll just have to play with those.

Click HERE view slideshow


Happy Easter and see you next time!

Bix x