Showing posts with label Gel Press. Show all posts

Friday, February 17, 2017

Hip Op and moving forward


Bandouille Lake 2017


Moving forward…and yes at a rate now too.

Its February already and I did have so many plans to write this sooner.  But old habits die hard.

The weather has been extraordinary.

I'm typing this after a day reaching 18 degrees???? But we have had lovely frosty days too.  But nothing like the snow and Ice that we used to get.

After my second hip op in November I am back on track and have been in the garden trying to catch up with raking up the leaves and generally tidying up.  Great (hopefully) for building up the muscle again.  I have also been in the Studio (and kitchen) doing lots of Gel Press Prints.  I had a fabulous run on those and got some great results too.

I have a Gel Plate workshop planned beginning of March and the ideas are racing! 

These three rectangular images were created using the largest  plate by Gel Press.  12 x 14 inch


Summer Days
Heron Haven - Bandouille


And then……I officially discovered "real" Collagraph printing.

I entered a challenge in January for fun - as I do - and the photo did not inspire me to paint it.  So I thought I would make a collagraph plate and see how that panned out.  Oh boy did I have fun.  I combined the technique with Gel printing and watercolour and this was my final entry to which a gained 4th place.  Seriously...I was thrilled!  Well who else is going to blow my trumpet? 


Of course I have made collagraphs before and used them in my Gel prints.

But when a few wonderful artists work popped up in my Pinterest feed I have been hooked ever since, wanting to know everything there is to know about collagaphing. I then realised how little I knew of this absorbing art  form.

So I have been researching and playing….of course!


In the meantime checkout Sarah Ross Thompson, Sue Brown and Hester Stolly Cox to name but a few.  Checkout Collagraph on Pinterest too and see what wonders you will get.

The beauty for me at the moment is that it is another tool from which to produce something unique.  

These artists above have spent a long time honing their craft and I do not wish to imagine that I can do what they do because I am not that far down that road - yet.  


With Pasta Maker
But I am using Collagraph techniques to create within my realms of knowledge in watercolour, collage, gel printing etc and enjoying the experimenting. I have also realised that this is a great way for any artist in any medium to get to know their subject.  As they have to create what they want to do in such intimate detail to create a plate.  By the time they have pulled a few prints every line, every edge is known to the artist.

I have just experimented with a Pasta Maker and also bought an old mangle with intent on converting it to a press.  We shall see! In the meantime I am using my body and my hands to press into the plates.  Fun!

If you  want to know more and get fantastic support and guidance join the Collagraph Worldwide FB group.  I have learnt so much from them and am truly inspired


Any of the above techniques can be learned at one of our standard holidays. 

We also have tutored holidays. 

Please enquire.  Our 2017 Art Holidays at Bandouille calendar is now open.

Please visit www.francepaintingholiday.com for all the details.

More coming up very soon.

Bix xx

Monday, May 23, 2016

Concertina Style Sketchbook

I am using my Gel Press™ prints for the covers of this concertina style sketchbook.  After an enormously inspirational day last week holding a Draw with Stitch workshop here at Bandouille with the lovely Jenny Harris last week my ideas are spiralling. 

The idea is based on Free motion stitching and the prints are perfect for this technique as the acrylic paint has given each print the stability to withstand the needles going through and added to that after the page has been glued to the backing card it is further stabilized!
Please click here to view the video slideshow


After I chose my base paper Gel Press™ prints I then embellished them by glueing on the two birds and embroidered around a similar flower from another print, cut it out and glued it on. I finished these off by sewing in Free motion around each element.


Select some card

Glue prints to the card after embellishment.  Here I have used another set of prints

You can add a pocket with clear acetate on outside back to collect bits of memorablia


The buttons and beads just added a bit of fun and the elastic holds the pages together when not in use.  The ends of the elastic are hidden by the first page of the sketchbook and will be glued into place also

Glue to pages onto the prepared card and fold over the edges neatly and also glue into place

Glue the embellished page to the front page of the book taking care to line it up and then glue the back to the back page.

Go as far as you want!

I hope you enjoyed this little project and will try this yourselves......

See you again soon

Bixxy x

Wednesday, April 20, 2016

World Earth Day with Gel Press

Welcome to the Gel Press Earth Day Blog Hop!

We want to encourage you to reuse and recycle with Gel Press.  Have you thought of making Gel Press Prints on old maps?  What about old Christmas cards or even magazines? 

Hop around and see what our designers have come up with for this hop.  We will be giving away a prize again for the comments on the Gel Press Blog listing what your favorite project was and why. 

Enter by going to all of the blogs listed and linked below.  Leave a comment on the Gel Press Blog telling us your favourite project. 

We will accept comments from April 20th - April 24th.    

The winner will be announced April 25th  on Gel Press Junkies FB page !  Good Luck!


****Please note that the prize is only valid for US residents at this stage***  Sorry!  But this doesn't stop everyone else joining in and commenting


Here is a Step by Step to show what I did to achieve this look and more!

Materials
8 inch Round Gel Press Plate                                                  SLIDESHOW BELOW
Acrylic Paints
Torn Paper
Stencil
Images for decoupage
Assorted pens for embellishing

***Top Tip***  
If you don't know where you are going with a project,  I like to do good quality photocopies of the base print that I like and keep some spares so that I can try different effects on each of them. Its also useful to have so you can create different things for different occasions. Each will still be unique.  This is also useful if something you are trying fails.   You will always have another at hand to do it again.


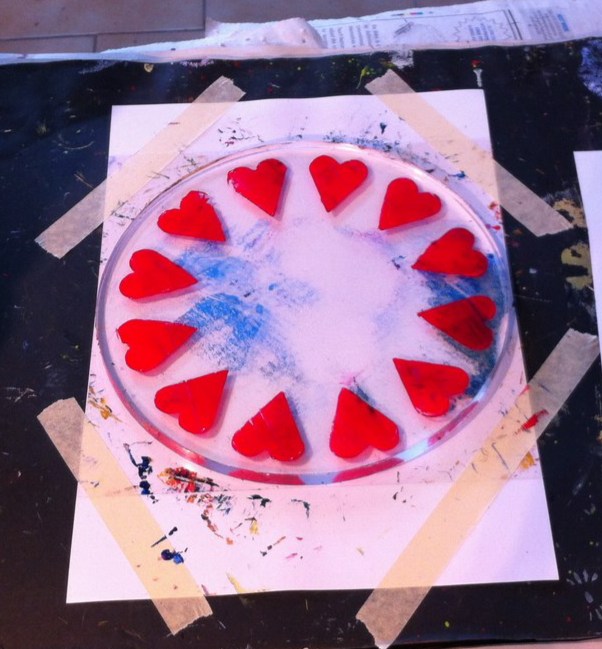
First select the plate you wish to use


I then printed off a design for under the first layer of paint (have more ready, just in case!!!!!)

I then spread the paint with the brayer making sure that this coat was thin and transparent

Next I lined up my prepared sheet of paper and made my pull. Wipe any areas of paint to expose more of the layer underneath 


I then add the stencil hearts all around the circle.  I prefer this method on the plate as the pull wont be so dense and it will have more texture to it.


I made my pull!

Tweak any changes you want to make whilst paint is wet maybe to reveal more of the writing beneath

I then added a decoupaged endangered Green Cheek Parrot on tissue and added the lettering via the computer as I was not sure if I want to make this permanent or not.  Remember you are in control!


Here is a slideshow of the others prints created from this session.  Some are finished and some are not and will be saved for a future occasion.  Click on the first image to activate slideshow


Please feel free to leave a comment and ask any questions you may have.
I hope that you enjoyed this blog entry and not its time to visit the others.  Just click on the links below and it should take you to where you need to go.


Till next time

Bixxy x


Gel Press
Kristi,
Teresa,
Keri,
Sandee
Cindi,
Cyndi,
Lea
Bix(you are here),
Kathy,
Ann,
Elena


Wednesday, April 13, 2016

Simple Landscape Video


As promised I have released a short video of how I do my landscapes under the Gel Press umbrella.

As you will see the steps are simple and easy to follow and you can make yours your own by introducing different colours, textures and subjects into your work.

I have shown the materials used and the outcome of each print.

Click HERE for video


Please feel free to comment or ask a question if you want


The final results of 4 pulls with embellishments

Click Here In the meantime France is sunny and getting warmer and together with the April showers we are also blessed with stunning views like this.


Holiday bookings are picking up once more after the terror strikes and there still a few places left on a couple of our Guest Tutor workshops.  Email us here at France Painting Holiday  for more info or visit the website

Also if you are interested in a printing workshop or a craft week also please inquire.  These workshops cannot takeplace unless we know that enough people are interested. 

Preparing now for the World Earthday bloghop on the 20th so visit this page again then with a chance to win a prize.

A bientot
Bixxy x
https://onedrive.live.com/redir?resid=4BE1A8D896E2CC3D!286&authkey=!ACoJkgvPjb8nLXU&ithint=folder%2cjpg

Thursday, March 17, 2016

Birds Nest for Easter Step by Step

"If we always do what we always did we always get what we always had!"


Perfect quote sent to me the other day by my lovely friend and fellow artist Joanne Boone Thomas

What a great saying! And its so true.  I am very much climbing out of my comfort zone and having such fun experimenting with new printing techniques.

I can't believe it was only last week that I received my delivery of all my new Gel Press plates and this is the first time or using a round one. 


So much has happened since then and all of it doing printing! Oh and planning, dreaming, sketching out ideas..............

Gel Press junky is now an understatement.  So whilst the paint is still wet I will fill you in with what I have done.

Here is a short step-by-step on how I achieved my nests of eggs.  A favourite subject at this time of year in all mediums and printing by no means gets left behind!
                                                                 SLIDESHOW BELOW

Materials
  • 8" Round Gel Press Plate
  • Acrylic paints
  • Brayer
  • Copy Paper
  • Bunch of grasses
  • Scrap Paper 
  • Egg cutouts (masks)
  • Embellishing materials and spare prints

 First I dabbed on nest colours of yellow ochre and burnt sienna
 I brayered this over the plate till the colours blended but in a patchy way
I then took my bunch of reed grass and moving around the plate pushed it into the paint thus picking up the paint on the way and leaving an impression
I then used the brayer to roll black paint on the grass
 and then pressed this onto the painted plate to leave black grass impressions
At this point I took a print with the centre a solid colour as one option
I then added three egg cutouts (masks) and pulled another print
I added cream and pink paint and rolled it out over the Gel Press plate
And got this, which I love!  Can you see the childs face in there?  Something to work on later.


Here is a short slideshow showing how some of them ended up.  A couple I would call finished and the others ....well i'll just have to play with those.

Click HERE view slideshow


Happy Easter and see you next time!

Bix x


Sunday, March 13, 2016

Fresh Air?

Spent nearly the whole of last week pretty much locked  in my very "underused in the winter" Studio as I took delivery of 14 different sized Gel Press Plates from Gel Press in the US on Tuesday. So not alot of fresh was had!!! A shock as I only had to wait 3 days and was thrilled when the box arrived jammed packed with goodies.

As part of my  role as a Creative Designer for the Team I need to play with each Gel Press Plate and see what I can come up with and my head is swimming with ideas.

So Tuesday was spent prepping the area in the Studio for my marathon session including lighting the stove on Wednesday and Thursday as it was pretty cold out there and the room takes a good while to warm up.

Somebody else wanted to join me in the warm studio, but at this point, covered in cobwebs, didnt gain entry. But managed to later and left a paw print or two.

I decided that I wanted to work on the 10x8 Gel Press plate as that was a bit larger than what I am used to.  Effectively it is just a wee bit smaller than an A4 sheet of paper as you can see from the image below.

For warming up I just added a few blobs of acrylic paint on the plate and smoothed them out with the brayer and textured the surface with some home made stamps and bubble wrap took a first pull and then added the dragonfly masks and some blue green paint rollered over the top
 
I next planned some landscapes that I had been storing in my "to do" file. And these were the outcome after embellishment

I like instant results so this method suits me well.  One of my favourites is below!


***TOPTIP***
My advice is go for a subject that you love...if you try to create something you do not like it will show in the finished work.

My Bonnie lies over the ocean
I shall be doing a landscape video very soon, so follow me here on this blog and on Gel Press Junkies for the latest updates from me and my Gel Press Creative Team mates..

I hope to launch my website this week so that you can see some Gel Press prints that were created in this session under Recent Work and my other work.


Please feel free to ask questions and leave a comment

Thats it for now

Bix x


Monday, March 7, 2016

First Gel Press Post


Hi everyone,

just announcing first post on the Gel Press Blog showing some of my sketches done on Gel Press prints via a short video I did on Youtube

Hope you enjoy what you see.

Please feel free to leave me a comment below.

Bx