 |
| Black on Colour |
 |
| 2nd Cut |
Snowdrops - Lino prints
I am an experimentalist (not even sure that's a real word - but I like it).
I am an experimentalist (not even sure that's a real word - but I like it).
I like to play and push theories as far as they can take me and maybe further.
So as a newbie with Lino here is what I recently did.....
So as a newbie with Lino here is what I recently did.....
Once I discovered the joys of printing, first via a Gel Plate and then doing collagraph work I was hooked (see previous entries) and desperate for some kind of "affordable" printing press. So I started my search.
Valentines day last year my search ended at Ebay and found this baby for £15.00. I still wasn't sure if it would work, but I was determined to try.

In this project I am Lino printing using my mangle as a printing press.
I have prepared it by rolling in a large MDF drawing board and made a registration jig using two corners of an A4 mount which has carefully been measured around the lino block aperture.
Here you can see that that aperture is larger than the block I will be using as I have squared it off. This did not really cause me any problems as I fitted it each time to the top left corner. Double sided tape can be used to keep the block in place
 |
| The mangle set up with the registration board |
I taped down the jig and set my rollers to the pressure that I need for lino printing. This would be set tighter if I were to collagraph (or intaglio) print.
I have two A4 board pieces taken from the back of old sketch pads and a large chammois style cloth folded in half.
I later replaced one of the A4 pieces for a much larger piece to cover the whole area.
I rolled out a few practice runs till I was happy with the pressure. This is important so that you do not ruin any potential prints.
Another theory I wanted to test was the use of Brusho powder in tinting block printing ink for printing from Lino. I have searched everywhere for reference to this and found nothing. So I thought I would see if it works. The same goes for the Brusho thickener......I needed to find another use for it. So I played.......
Another theory I wanted to test was the use of Brusho powder in tinting block printing ink for printing from Lino. I have searched everywhere for reference to this and found nothing. So I thought I would see if it works. The same goes for the Brusho thickener......I needed to find another use for it. So I played.......
 |
| I printed all the backgrounds using these colours |
 My materials for this project
 |
| Ist cut - leaving the white |
My Lino block
Black and White Block printing ink (waterbased)
Brusho in Blue and Yellow
Acrylic Paints
Brusho thickener to help with consistency
Brayers or rollers
Tile to roll out colour
Different papers and card.
I began by planning my design and then cutting out the areas I wanted to keep white.

Black and White Block printing ink (waterbased)
Brusho in Blue and Yellow
Acrylic Paints
Brusho thickener to help with consistency
Brayers or rollers
Tile to roll out colour
Different papers and card.
I began by planning my design and then cutting out the areas I wanted to keep white.
I then wanted to print some pretty backgrounds using light blues and greens. This is achieved by putting down some of the white block printing ink on a plate and sprinkling in some Ost Blue Brusho powder and added some of the Brusho thickener that was now in gel form. As the white ink was waterbased this was possible. DO NOT TRY WITH OIL BASED INK.
I worked the mix till I got the right colours and consistency.
Here are examples of how they turned out. The thinner the mix the more Iiked it.
I worked the mix till I got the right colours and consistency.
Here are examples of how they turned out. The thinner the mix the more Iiked it.

I love the gentle texture the Brusho gives on these prints.
 |
| 2nd cut |
 |
| Ink loosened with Brusho |
This area will show the how much of the background I want and the first printing of stems and leaves.
The ink is very very thick so I added some Brusho gel to loosen (not water)
I worked the ink till it was tacky and sounded like velcro.
I decided to do a black run first.
 |
| Just Black on White |
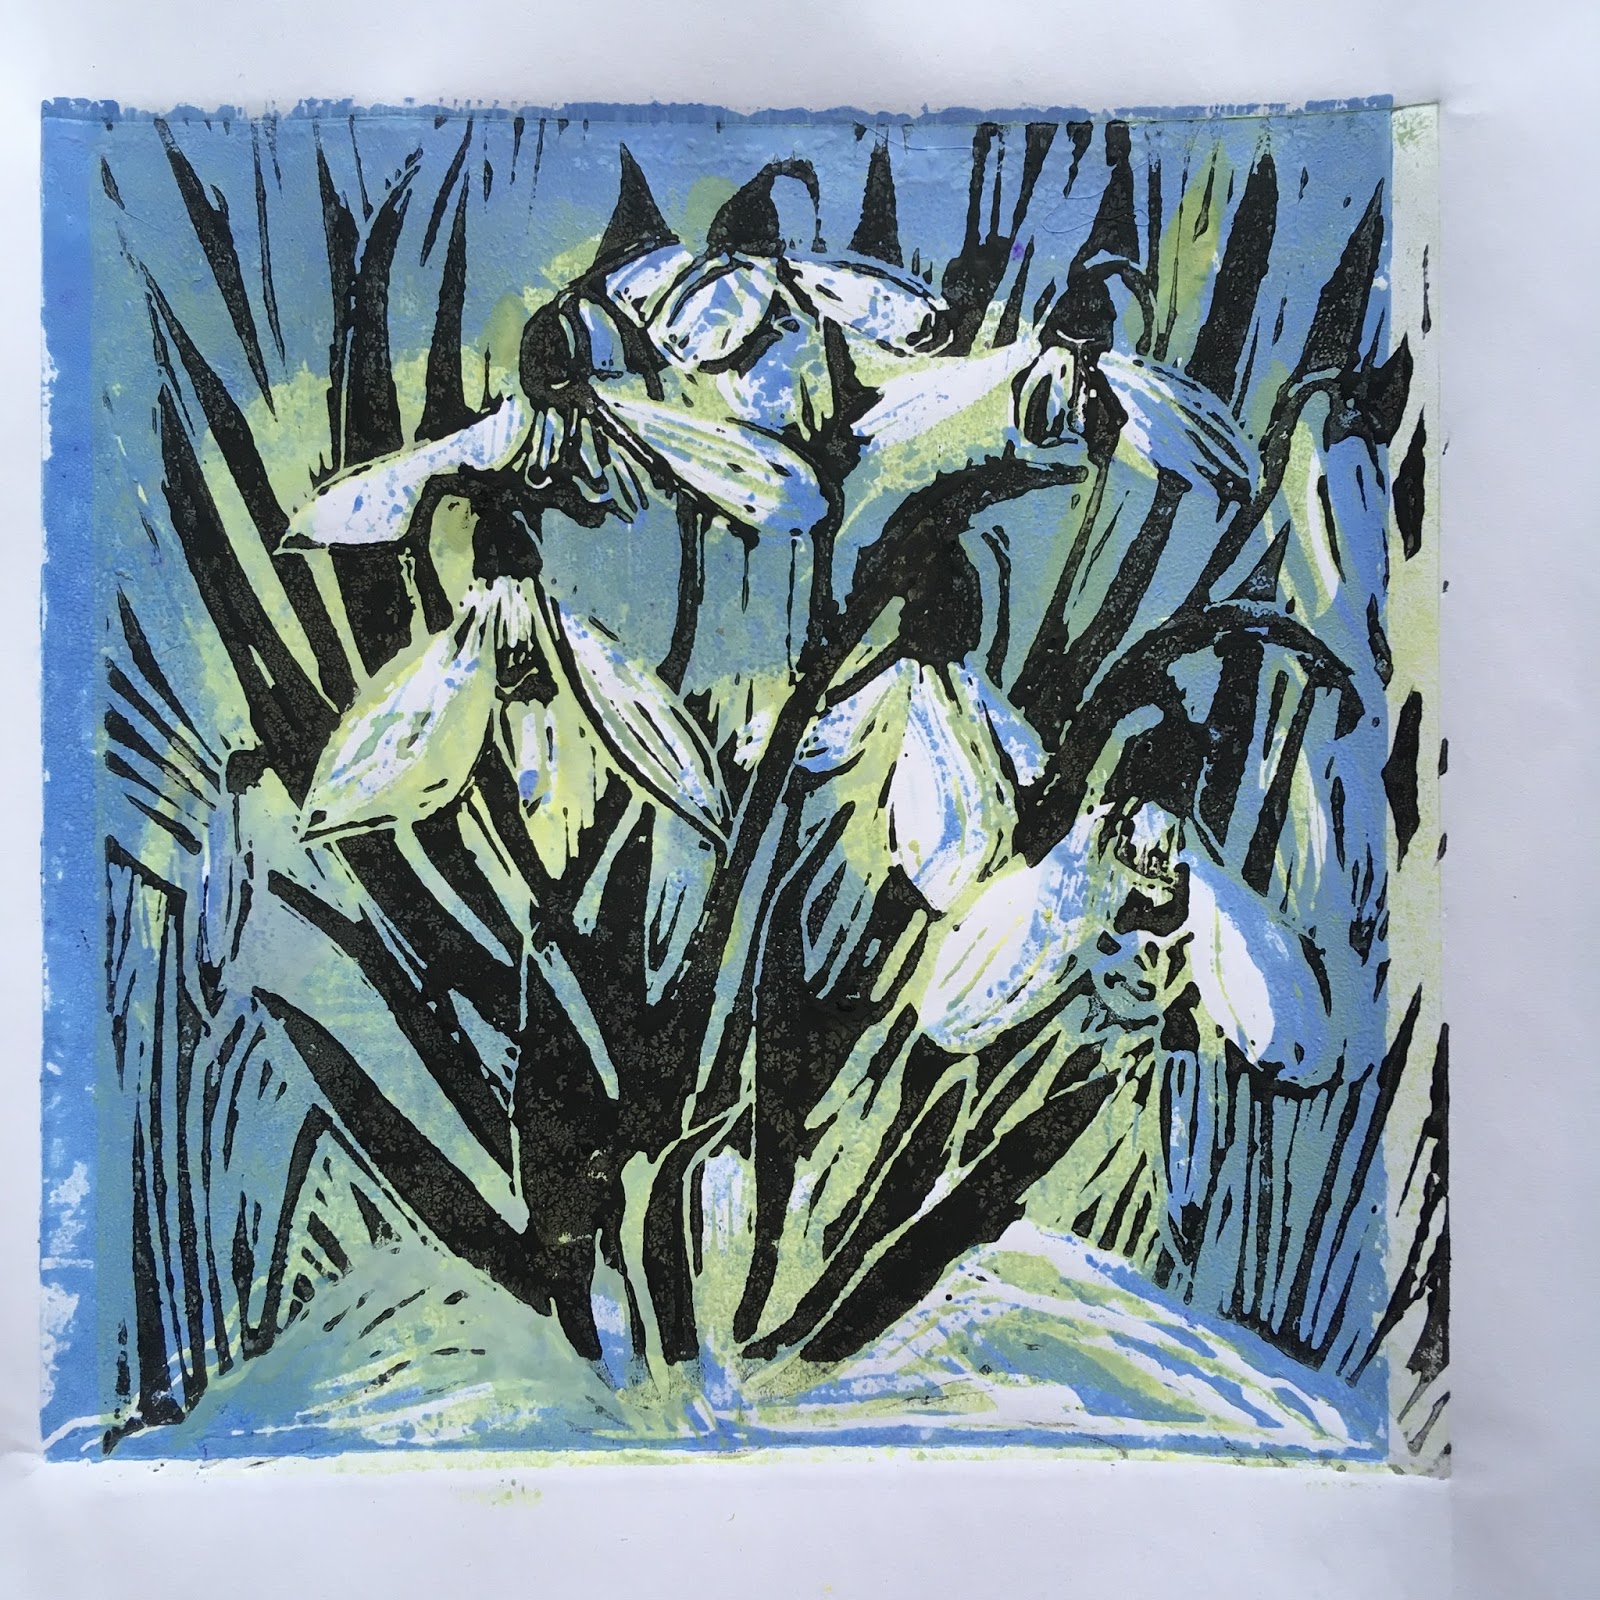 |
| Black on colour |
These turned out to be very effective.
I like both looks.


I then rolled out a brighter green first with brusho
and later with acrylic paints
(which I have found to work very well)
and did my 2nd cut green print over the backgrounds


 Different looks are achieved by using different greens and different rollers too.
The softer the roller the denser the print. I made my own soft roller using a childs sponge roller and replace the sponge with a cork covered in foam sheet stuck with a glue gun....
Worked perfectly......

I also printed the green over previously pre printed monoprints for a very different subtle look

The last stage was doing the 3rd cut which will show some of the lighter green as highlights etc with a darker edge.
This time I used a combination of blue and green acrylics.
 |
| A final print on textured paper |

I am still very new to this method and many of the prints were not perfect for various reasons. But I have learnt so much during the process which will enable me to achieve a better quality batch next time.
Although the block I am left with doesn’t have much left on it it still has enough to give an impression of a group of snowdrops and I can play more with this idea later.
Watch
this space.
VIDEO I have made a video showing the processes and the results. Click on the link here
Thank you for joining me here and if you have any comments please do not hesitate to ask in the comments below.
Thank you for joining me here and if you have any comments please do not hesitate to ask in the comments below.
See
you soon
Bix
x
NB: Brusho products from Colourcraft Ltd , Blocking printing ink from Seawhites of Brighton


